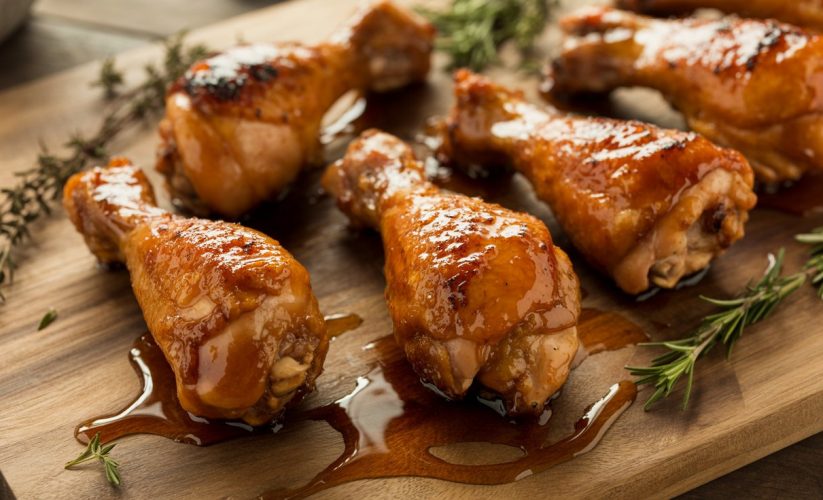

Smoked Christmas Ham with Ninja Woodfire
The holiday season brings families together around the dinner table, and few centerpieces are as impressive as a beautifully smoked Christmas ham. Using the Ninja Woodfire outdoor grill and smoker transforms this traditional holiday dish into a restaurant-quality masterpiece with rich, smoky flavors that elevate any festive gathering. This modern approach to a classic recipe combines the convenience of contemporary outdoor cooking technology with time-honored smoking techniques, delivering results that rival professional barbecue establishments.
The Ninja Woodfire system has revolutionized home smoking by eliminating the steep learning curve typically associated with traditional offset smokers or charcoal setups. Home cooks can now achieve authentic wood-fired flavors without spending years mastering fire management or temperature control. The result is a holiday ham that showcases deep mahogany coloring, tender meat that pulls away easily, and layers of complex smoky sweetness that transform a simple main course into the star of the holiday spread.
“Smoking transforms holiday ham from a simple main course into an unforgettable centerpiece that guests will request year after year. The wood-fired element adds complexity that perfectly balances the ham’s natural sweetness.”
— Southern Living Magazine
Key Takeaways
- The Ninja Woodfire grill creates authentic wood-smoked flavor without the complexity of traditional smokers
- A bone-in ham works best for smoking, retaining moisture and enhancing flavor during the cooking process
- Glazing during the final hour of cooking creates a caramelized, flavorful crust
- Total cooking time ranges from 3-4 hours depending on ham size
- The smoker maintains consistent temperature, eliminating the need for constant monitoring
- Proper preparation including scoring and dry rub application maximizes flavor penetration
- Resting the ham after smoking ensures juicy, tender results

- 4-in-1 Functionality: Combines a Woodfire Grill, BBQ Smoker, Outdoor Air Fryer, and Oven in one compact, electric unit. Infuse every dish with 100% real woodfire flavor using authentic wood pellets.
- XL Capacity for Entertaining: Cook for a crowd with 180 sq. in. of grill space with 30% more than the original Ninja outdoor grill. Perfectly fits 2 full racks of ribs, 10 burgers, 4 lbs. of wings, 2 whole chickens, or a 10-lb brisket.
- Smart Built-In Thermometer: Take the guesswork out of grilling with a precision temperature probe that monitors doneness in real time and alerts you when your food is perfectly cooked.

- MASTER GRILL, BBQ SMOKER, & AIR FRYER: All in one with 100% real smoky flavor..Voltage: 120 volts
- MASTER GRILL: Get all the performance of a full-size propane grill with the same char and searing.
- FOOLPROOF BBQ SMOKER: Create authentic BBQ bark and flavor fast and easy with just 1/2 cup of pellets.

- MASTER GRILL, BBQ SMOKER, & AIR FRYER: All In one with 100% authentic smoky flavors.
- MASTER GRILL: Get all the performance of a full-size propane grill with the same char and searing.
- FOOLPROOF BBQ SMOKER: Create authentic BBQ bark and flavor fast and easy with just 1/2 cup of pellets.

- 7-IN-1 FUNCTIONALITY: Grill, BBQ smoke, Air Fry, Roast, Bake, Broil, and Dehydrate with 100% real woodfire flavors all in one place.
- CAPACITY TO ENTERTAIN: 180 square inches of cooking space—30% more than the original Ninja outdoor grill—that fits up to 2 full racks of ribs, 10 burgers, 4 lbs of wings, 2 7-lbs chickens, or a 10-lb brisket.
- COOK WITHOUT THE GUESSWORK: Use the Ninja ProConnect app to pair your grill to your phone to monitor and control cook time and temp of two different proteins, receive real-time notifications, and even access cooking charts.
Why Choose Smoked Ham for Christmas
Traditional baked ham has long been a holiday staple, gracing tables from Thanksgiving through New Year’s celebrations. However, smoking introduces an entirely new dimension of flavor that transforms this familiar dish into something extraordinary. The low-and-slow cooking method allows smoke to penetrate deep into the meat, creating layers of taste that beautifully complement the ham’s natural sweetness and savory notes.
The Ninja Woodfire makes this sophisticated technique accessible to home cooks without requiring extensive outdoor cooking experience or expensive equipment investments. Unlike traditional smokers that demand constant attention, frequent fuel additions, and careful temperature monitoring, this appliance handles the technical aspects automatically. Cooks can focus on preparation and presentation rather than babysitting equipment throughout the afternoon.
The appliance’s wood pellet system generates authentic woodfire flavor while maintaining precise temperature control throughout the cooking process. This combination ensures even cooking throughout the ham while developing that coveted smoke ring and mahogany exterior that signals perfectly prepared smoked meat. The smoke ring, a pink layer just beneath the surface, results from chemical reactions between smoke compounds and the meat proteins, serving as a badge of honor among barbecue enthusiasts.
Beyond flavor improvements, smoking offers practical advantages for holiday entertaining. The outdoor cooking method frees up valuable oven space for side dishes, casseroles, and desserts. During busy holiday preparation, this extra capacity proves invaluable. Additionally, smoking keeps cooking odors outside rather than filling the house, and the extended cooking time allows hosts to manage other party preparations without rushing.
Selecting the Perfect Ham
Choosing the right ham sets the foundation for a successful recipe. A bone-in, spiral-cut ham weighing 8–10 pounds is ideal for most families, serving 12–16 people with generous portions and leaving leftovers for sandwiches or soups. The bone helps the meat cook evenly and adds depth to the flavor. As it cooks, it releases collagen and minerals that enhance both taste and texture. Selecting the right size and cut ensures a juicy, flavorful centerpiece for your meal.
Pre-Cooked Hams: Convenience and Safety
Pre-cooked hams are strongly recommended. The smoking process is meant to add flavor and warm the meat, not cook it from raw. Most grocery store hams are fully cooked or “ready to eat,” which provides both convenience and food safety. With pre-cooked hams, the internal temperature only needs to reach 140°F, unlike raw pork that requires much higher temperatures. Choosing pre-cooked hams simplifies preparation while guaranteeing safe, tender results.
Choosing Quality Hams
When shopping, read labels carefully and look for hams with minimal added water content. High-quality hams have better texture and absorb smoke more effectively. Terms like “ham with natural juices” indicate quality, whereas “ham and water product” may contain up to 20% added liquid. While moisture-enhanced hams cost less, they often yield less flavor and a softer texture. Selecting a ham with natural juices ensures a more flavorful, satisfying smoked result.
Shank-End vs. Butt-End
Decide between a shank-end or butt-end ham. The shank end has a single, easily navigable bone and uniform meat, making carving simple and neat. The butt end offers slightly more meat and a richer flavor but has a more complex bone structure. For presentation and ease of slicing, many holiday hosts prefer the shank end. Your choice will depend on whether convenience or maximum meat yield is your priority.
Scoring the Ham
Begin by scoring the ham’s surface in a diamond pattern, cutting about a quarter-inch deep through the outer layer. This technique is both practical and decorative. The cuts allow glaze to penetrate deeper, increase the surface area for smoke absorption, and help render fat during cooking. Space the cuts about one inch apart in both directions to create uniform diamonds across the ham.
Managing the Fat Layer
Trim excess fat, leaving roughly a quarter-inch layer. This remaining fat bastes the ham naturally as it cooks, keeping the meat moist and enhancing flavor. Too much fat can block smoke penetration and cause flare-ups, while too little allows the surface to dry out. Balancing the fat layer ensures even cooking and a flavorful finish.
Applying a Dry Rub
Enhance the ham’s natural flavors with a simple dry rub. Combine ½ cup brown sugar, 2 tablespoons black pepper, 1 tablespoon paprika, and 1 teaspoon mustard powder. Apply generously across the ham, working the mixture into the scored cuts with hands or a brush. The sugar will caramelize during smoking, creating a flavorful, textured bark.
Optional Flavor Enhancements
For more complexity, consider adding garlic powder, onion powder, cayenne pepper, or dried herbs like thyme or rosemary. Smoking allows customization, so you can create signature flavors for family traditions or holiday meals. These small additions can subtly elevate the ham without overpowering its natural taste.
Resting Before Smoking
After applying the rub, some pitmasters recommend letting the ham rest in the refrigerator for several hours or overnight. This allows the seasonings to penetrate more deeply, intensifying flavor. If you follow this step, always bring the ham back to room temperature before smoking to ensure even cooking throughout.
Setting the Temperature
Set the Ninja Woodfire to its smoke setting at 225°F, the ideal low-and-slow temperature for maximum flavor without drying the ham. This range is hot enough to render fat and develop a rich bark while cool enough for extended cooking, allowing the meat to absorb smoke fully. This temperature “sweet spot” is key for achieving juicy, flavorful results.
Choosing the Wood
Fill the pellet compartment with a mild wood such as apple, cherry, or hickory. Each wood adds unique flavor:
- Apple: subtle sweetness with fruity undertones that complement the ham.
- Cherry: slightly stronger smoke with rich color development.
- Hickory: traditional barbecue flavor with pronounced smoke.
Some smokers blend woods for custom flavors, like 60% apple and 40% hickory, balancing sweetness and smoke. Experimenting with combinations allows you to develop a signature flavor profile.
Positioning and Monitoring
Place the ham cut-side down on the grill grate to expose more surface to smoke while protecting the interior meat. Insert a leave-in meat thermometer into the thickest part, avoiding the bone for accurate readings. The target internal temperature is 140°F, typically taking 15–20 minutes per pound. For a 9-pound ham, expect around 3–3.5 hours of cooking.
Maintaining Smoke and Heat
During the first two hours, avoid opening the lid frequently. Each opening releases heat and smoke, extending cooking time and reducing smoke penetration. Rely on the thermometer to track progress. The Ninja Woodfire maintains steady temperature automatically, so constant attention isn’t necessary.
Managing Pellets
Monitor pellet levels and add more if needed for longer sessions. Continuous smoke is essential for developing a deep pink smoke ring and rich, smoky flavor. Using the appliance’s indicators ensures consistent smoke generation throughout the cooking process.
Crafting the Glaze
While the ham smokes, prepare a glaze that will create the signature glossy finish and add final flavor notes. A classic combination includes one cup of brown sugar, half a cup of honey, three tablespoons of Dijon mustard, two tablespoons of apple cider vinegar, and warm spices like half a teaspoon each of ground cinnamon and cloves. Heat these ingredients together in a saucepan over medium heat until the sugar dissolves completely and the mixture thickens slightly, about five to seven minutes. The vinegar’s acidity balances the sweetness while helping the glaze adhere to the meat’s surface.
Alternative glaze options abound, limited only by imagination and pantry contents. Bourbon-based versions add sophisticated depth and complexity, with the alcohol cooking off while leaving behind rich caramel notes. Combine bourbon with brown sugar, maple syrup, and a touch of hot sauce for a grown-up twist. Pineapple juice-based glazes bring tropical sweetness that pays homage to traditional baked ham preparations, mixing juice with brown sugar, ginger, and soy sauce for Asian-inspired notes. Maple syrup glazes offer New England charm, particularly when enhanced with whole grain mustard and a splash of apple cider.
The glaze serves both aesthetic and culinary purposes, creating eye-catching visual appeal while adding a final concentrated layer of taste that ties together all the preceding flavors. Multiple thin coats build up gradually, creating better adhesion and more complex flavor development than single thick applications.
Glazing and Finishing
When the ham reaches 120°F internal temperature, begin the glazing process. This timing allows approximately 45-60 minutes for glaze application and caramelization before reaching the target temperature. Brush a generous layer over the entire surface using a silicone basting brush, allowing the glaze to settle into the scored cuts where it will intensify flavor. Return the ham to the smoker and apply additional coats every 15 minutes for the final hour of cooking.
This repeated glazing builds up layers of flavor and creates the characteristic sticky, caramelized exterior that makes smoked ham irresistible. The sugars in the glaze caramelize under heat, undergoing complex chemical transformations that create hundreds of flavor compounds. This Maillard reaction forms a bark that provides textural contrast to the tender meat beneath while contributing deep, rich taste notes.
Watch the glaze carefully during this final phase to prevent burning. If the surface begins darkening too quickly, reduce heat slightly or tent loosely with foil while continuing to cook to target temperature. The goal is deep mahogany coloring with sticky glaze, not blackened surfaces.
Resting and Serving
Once the ham reaches 140°F, remove it carefully from the smoker using heat-resistant gloves or towels and tent loosely with aluminum foil. Allow it to rest for 15-20 minutes before carving. This resting period lets juices redistribute throughout the meat, ensuring every slice remains moist and flavorful rather than losing liquid when cut.
Carve the ham by following the natural separations created by the spiral cut, working around the bone systematically. Arrange slices on a warmed platter in overlapping rows, showcasing the beautiful smoke ring and glazed exterior. Drizzle any accumulated juices over the top for additional moisture and shine. Garnish the platter with fresh herbs like rosemary or thyme sprigs, orange slices, or fresh cranberries for festive presentation.
Storage and Leftovers
Leftover smoked ham offers incredible versatility beyond simple reheating. Store properly wrapped portions in the refrigerator for up to five days or freeze for up to three months. The smoky flavor intensifies slightly after a day as compounds continue reacting with proteins, making leftovers even more delicious than the original meal.
Transform extras into ham and bean soup, breakfast hash with potatoes and eggs, gourmet sandwiches with melted cheese and mustard, or pasta carbonara enriched with smoky pork. The bone can be simmered with vegetables, bay leaves, and peppercorns to create a rich stock for future soups and stews, ensuring nothing goes to waste while maximizing value from the original purchase.
Conclusion
Smoking a Christmas ham with the Ninja Woodfire outdoor grill elevates a holiday tradition into something extraordinary that guests will remember long after the season ends. The combination of wood-fired flavor, careful preparation, and proper technique creates a centerpiece worthy of the season’s most important meals and special gatherings. While the process requires several hours from start to finish, the actual hands-on time remains minimal thanks to the appliance’s efficient design and temperature stability. The result is tender, flavorful ham with a beautiful presentation that will have guests asking for the recipe and requesting an encore performance next year. This modern approach to classic smoking delivers professional results accessible to home cooks of all skill levels, democratizing techniques once reserved for barbecue specialists and bringing restaurant-quality outcomes to family tables.
Frequently Asked Questions
Can a fully cooked ham be smoked in the Ninja Woodfire?
Yes, fully cooked hams are ideal for smoking. Since they’re already cooked, the smoking process adds flavor rather than cooking the meat. Simply heat the ham to an internal temperature of 140°F while infusing it with wood smoke. This approach is actually preferred as it reduces the risk of drying out the meat and provides more consistent results than smoking raw pork.
What type of wood pellets work best for smoking ham?
Fruit woods like apple and cherry provide mild, sweet smoke that complements ham’s natural flavors. Hickory offers a more robust, traditional barbecue taste. Avoid mesquite or other strong woods as they can overpower the meat. Many pitmasters prefer mixing apple and hickory for balanced flavor, combining fruity sweetness with classic smoke character.
How much glaze is needed for a 9-pound ham?
Prepare approximately 1.5 to 2 cups of glaze for a ham this size. This allows for multiple applications during the final hour of cooking. Extra glaze can be served alongside the carved ham or reserved for reheating leftovers. Having extra ensures you won’t run short during the crucial glazing phase.
Should the ham be covered with foil while smoking?
No, keep the ham uncovered during smoking to allow maximum smoke penetration and glaze caramelization. Only tent with foil during the resting period after removing from the smoker. Covering during cooking would steam the ham rather than smoking it and prevent proper bark formation and smoke ring development.
Can the Ninja Woodfire accommodate larger hams?
The standard Ninja Woodfire can accommodate hams up to 10-12 pounds depending on their shape. For larger gatherings requiring bigger hams, consider smoking two smaller hams rather than one large one. This also provides an opportunity to try different glaze variations and ensures more even cooking throughout.
Last update on 2026-02-19 / Affiliate links / Images from Amazon Product Advertising API
*We may earn a commission for purchases made using our links. Please see our disclosure to learn more.