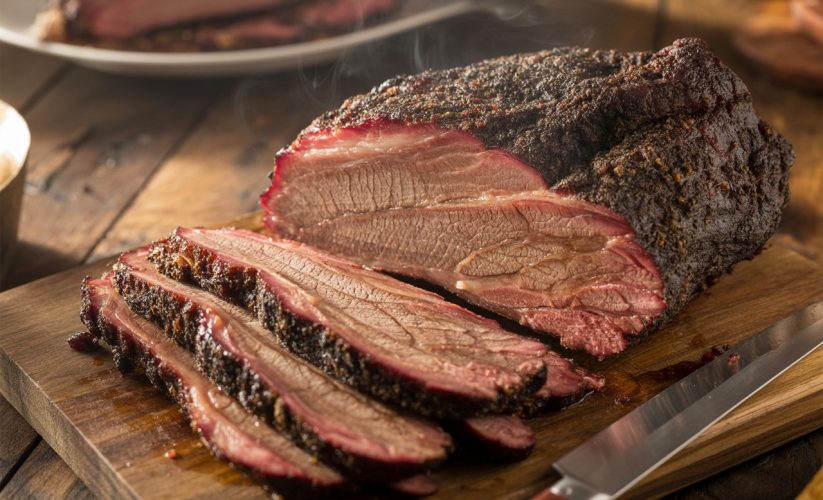
Smoke Brisket on Ninja Woodfire Grill
The culinary world has long held the belief that authentic, competition-grade brisket can only be produced by a dedicated pitmaster tending a massive offset smoker for sixteen hours. However, the introduction of the Ninja Woodfire Grill has fundamentally challenged this narrative. By combining the precision of electric heat with a high-velocity smoke delivery system, this compact powerhouse allows home cooks to achieve a succulent, bark-covered brisket without the logistical nightmare of a traditional wood fire.
While the technology inside the grill is sophisticated, the art of the brisket remains rooted in patience and technique. Smoking a brisket on this specific unit requires a shift in perspective. You are not just cooking meat; you are managing a thermodynamic process within a pressurized, high-efficiency environment. Because the Ninja Woodfire Grill utilizes a smaller cooking chamber and a concentrated pellet ignition system, every decision—from the thickness of the fat cap to the timing of the wrap—is magnified. This guide provides an exhaustive look at how to master the “King of Meats” using the most innovative portable grill on the market.
“Barbecue is not just about the meat; it’s about the transformation of a tough, humble cut into something sublime through the alchemy of smoke and time.”
— The Pitmaster’s Handbook of Southern Tradition
Key Takeaways
- Size Matters: Select a 5- to 7-pound brisket flat or a small, trimmed packer to ensure proper airflow within the compact Ninja chamber.
- The Woodfire Secret: Utilize the “Smoker” function with high-quality 100% hardwood pellets to maximize flavor in a shorter window.
- Master the Bark: A heavy seasoning of coarse salt and 16-mesh black pepper is essential for creating the characteristic dark exterior.
- Thermal Management: Respect the “stall” (around 160°F) and use pink butcher paper to preserve moisture without ruining the bark.
- The Invisible Ingredient: Time is your best friend; a minimum two-hour rest in an insulated environment is the difference between dry meat and perfection.

- 7-IN-1 FUNCTIONALITY: Grill, BBQ smoke, Air Fry, Roast, Bake, Broil, and Dehydrate with 100% real woodfire flavors all in one place.
- CAPACITY TO ENTERTAIN: 180 square inches of cooking space that fits up to 2 full racks of ribs, 10 burgers, 4 lbs of wings, 2 7-lbs chickens, or a 10-lb brisket.
- COOK WITHOUT THE GUESSWORK: Use the Ninja ProConnect app to pair your grill to your phone to monitor and control cook time and temp of two different proteins, receive real-time notifications, and even access cooking charts.

- MASTER GRILL & BBQ SMOKER: All in one with 100% real smoky flavor.
- ELECTRIC MASTER GRILL: Get all the performance of a full-size propane grill* with the same char and searing, with 1760 Watts of fully electric power. *compared to a Weber spirit
- FOOLPROOF BBQ SMOKER: Create authentic BBQ bark and flavor fast and easy with just 1/2 cup of pellets.

- 7-IN-1 FUNCTIONALITY: Grill, BBQ smoke, Air Fry, Roast, Bake, Broil, and Dehydrate with 100% real woodfire flavors all in one place.
- CAPACITY TO ENTERTAIN: 180 square inches of cooking space—30% more than the original Ninja outdoor grill—that fits up to 2 full racks of ribs, 10 burgers, 4 lbs of wings, 2 7-lbs chickens, or a 10-lb brisket.
- COOK WITHOUT THE GUESSWORK: Use the Ninja ProConnect app to pair your grill to your phone to monitor and control cook time and temp of two different proteins, receive real-time notifications, and even access cooking charts.
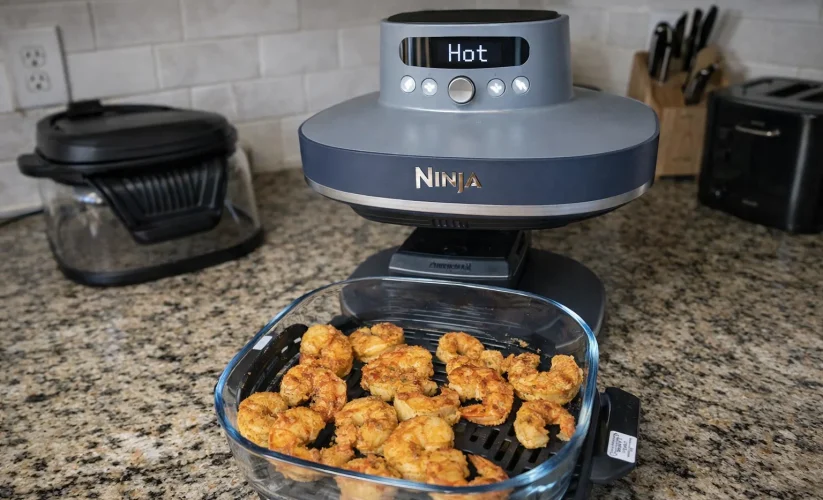
Understanding the Ninja Woodfire Technology
To cook a world-class Smoke Brisket on Ninja Woodfire Grill, one must first understand the tool. Unlike traditional pellet grills that use pellets as both a fuel source and a flavor source, the Ninja Woodfire Grill uses electricity for heat and a small, dedicated “Woodfire Flavor” box for smoke. This distinction is vital. Because the heat is consistent and electric, you don’t have to worry about “dirty smoke” from a smoldering fire. However, because the smoke box is smaller, the timing of your pellet refills and the quality of the wood you choose become the primary drivers of flavor.
The Ninja’s fan-forced convection system circulates heat and smoke more aggressively than a standard offset smoker. This means the meat cooks slightly faster and the exterior dries out more quickly, which can be an advantage for bark formation but a risk for the internal moisture of the flat. Balancing these forces is the key to a successful cook.
Selecting the Perfect Cut for the Ninja
In a traditional 500-gallon smoker, you can fit a 20-pound “full packer” brisket with ease. On the Ninja Woodfire Grill, space is at a premium. For the best results:
- The Cut: Look for a “Prime” grade brisket flat or a small “Whole Packer” that has been trimmed down to roughly 6 or 7 pounds. The “Flat” is the leaner portion of the brisket, while the “Point” is the fattier, marbled section. A small packer gives you both, but a large flat is often easier to manage on the Ninja’s grate.
- The Grade: Always opt for Prime if your budget allows. The higher the intramuscular fat (marbling), the more forgiveness you have. Since the Ninja’s fan can be intense, that extra fat ensures the meat stays juicy even if the temperature fluctuates.
- The Flex Test: Pick up the brisket (if it’s in a vacuum-sealed bag) and see if it bends easily. A brisket that is flexible is generally more tender and has less “hard” internal fat that won’t render during the cook.
The Art of the Trim
Trimming is arguably the most overlooked step in the brisket process. On the Ninja, a bad trim can lead to uneven cooking or “puddling” where rendered fat sits on top of the meat and prevents the bark from forming.
- Remove the Hard Fat: Look for the “deckle,” which is the hard, white fat between the point and the flat. This fat will never melt, no matter how long you cook it. Carve it out carefully.
- The 1/4 Inch Rule: Trim the fat cap on the bottom of the brisket to a uniform 1/4 inch thickness. This is enough to protect the meat from the heat coming off the grill grate but thin enough to render down and flavor the meat.
- Aerodynamics: Round off any sharp corners. Thin, dangling bits of meat will burn and turn into “jerky” long before the rest of the brisket is done. Aim for a smooth, aerodynamic oval shape.
Seasoning and the “Dalmatian” Rub
When it comes to brisket, simplicity is the gold standard. You want the flavor of the beef and the smoke to shine.
- The Binder: Apply a very thin coating of yellow mustard or beef tallow. You won’t taste the mustard; it simply acts as a glue for the spices.
- The Rub: Use a 1:1 ratio of Coarse Kosher Salt and 16-mesh Black Pepper. The coarse texture is critical because it creates “nooks and crannies” on the surface of the meat where smoke can attach, eventually forming the bark.
- Granulated Garlic: Many pitmasters add a half-part of granulated garlic for an extra savory note (UMAMI).
- Application: Don’t just sprinkle; pat the seasoning into the meat. Ensure the sides are just as well-coated as the top and bottom.
The Cook: Phase by Phase
Phase 1: The Smoke Infusion (0–4 Hours)
Set your Ninja Woodfire Grill to the Smoker setting at 225°F. Fill the pellet box with a robust hardwood like Hickory or Oak. Place the brisket on the center of the grate. During this initial stage, the meat is cool and moist, which is the optimal state for smoke absorption.
- Pellet Management: The Ninja will smoke for about 30–40 minutes per scoop. For a brisket, you want to hit it with smoke for at least the first three hours. Be prepared to refill the smoke box twice.
- Spritzing: After the second hour, check the brisket. If the edges look dry, spritz them with a mixture of apple cider vinegar and water (50/50). This keeps the surface cool and helps the smoke stick.
Phase 2: The Stall (Internal Temp 160°F–170°F)
The “stall” is a phenomenon where the internal temperature of the brisket stops rising for several hours. This happens because moisture is evaporating from the surface, cooling the meat at the same rate the grill is heating it.
Do not panic. Do not turn up the heat. This is when the collagen is breaking down into gelatin. To get through the stall, you have two choices:
- Patience: Let it ride. This results in the crunchiest bark but takes much longer.
- The Texas Crutch: Wrap the brisket tightly in pink butcher paper. This traps just enough heat to push through the stall while allowing the meat to breathe. Avoid foil if you want a crunchy bark, as foil “steams” the meat and can make the exterior mushy.
Phase 3: The Finish (Internal Temp 190°F–205°F)
Once wrapped, return the brisket to the Ninja. Since it is wrapped, you can actually increase the grill temperature to 250°F to speed up the final render.
The most important lesson in brisket is that temperature is just a guide; feel is the law. Start checking for “probe tenderness” once the internal temperature hits 195°F. Slide a thermometer probe into the thickest part of the flat. If it feels like sliding a needle into a jar of room-temperature butter, it is done. If there is any resistance, give it another 15 minutes.
The Rest: The Most Important Step
The brisket has been under intense heat and pressure for 8 to 10 hours. The muscle fibers are tight and the juices are pushed toward the surface. If you slice it now, those juices will evaporate or run off, leaving you with dry meat.
- Vent the Steam: Open the butcher paper for 5 minutes to let the initial “carryover” steam escape. This stops the cooking process.
- The Cooler Method: Re-wrap the brisket and place it in a high-quality insulated cooler (without ice). Surround it with old towels to fill the air gaps.
- Duration: Rest the meat for at least 2 hours. Many professionals rest their brisket for 4 to 6 hours. This allows the juices to redistribute and the rendered fat to set into a silky, decadent texture.
Slicing and Presentation
The way you slice a brisket can determine whether it feels tender or tough.
- Find the Grain: Before you season the brisket, take note of which way the muscle fibers run.
- The 90-Degree Rule: Always slice perpendicular (against) the grain.
- Thickness: Aim for slices the thickness of a pencil.
- The “Pull Test”: A perfect slice should hold its own weight when draped over a finger but pull apart easily with the slightest tug.
Maintaining Temperature and Airflow
A critical aspect of using the Ninja Woodfire Grill for long cooks like brisket is the management of its internal environment. Because the unit is more compact than a traditional smoker, the heat distribution is more immediate. It is vital to ensure that the grill is placed on a level, heat-resistant surface away from high winds. Strong gusts can interfere with the intake and exhaust vents, causing the internal temperature to fluctuate.
Furthermore, do not overcrowd the grill. If the brisket is touching the sides of the cooking chamber, the airflow will be restricted, leading to uneven cooking and “hot spots.” Maintaining a clear zone of at least an inch around the meat allows the convection fan to circulate smoke effectively, ensuring that the bark develops uniformly across all surfaces.
Troubleshooting Common Challenges
Even with the best preparation, brisket can be unpredictable. Here are some solutions to common issues:
- The “Grey” Bark: If your bark looks grey or pale rather than a dark mahogany, it is likely due to high humidity or insufficient seasoning. Ensure your rub has plenty of coarse black pepper and avoid over-spritzing in the first four hours.
- Tough Flat, Tender Point: This is a common issue with whole packers. Because the flat is leaner, it cooks faster. If you notice the flat reaching probe tenderness while the point is still tough, you can shield the flat with a small piece of foil or adjust its position further from the main heating element.
- Burnt Bottom: If the bottom of the brisket is becoming too charred, it is reacting to the heat of the grates. Placing the brisket on a small wire cooling rack set on top of the grill grates can provide a slight air gap that prevents direct contact burning.
The Science of Tenderness
What makes a brisket “good”? At a molecular level, you are converting collagen—the tough connective tissue that makes the brisket muscle strong—into gelatin. This process is not instantaneous; it requires a specific temperature range ($160°F$ to $200°F$) and time. This is why “low and slow” is not just a catchphrase; it is a chemical necessity. The Ninja Woodfire Grill’s ability to hold a steady $225°F$ allows this conversion to happen efficiently without drying out the moisture within the cells.
Flavor Profiles and Wood Pairings
The type of wood you choose for your Ninja pellets will define the character of your brisket.
- Hickory: The classic choice. It provides a strong, bacon-like aroma that stands up well to beef.
- Oak: The choice of Central Texas pitmasters. It offers a medium smoke profile that is very balanced.
- Mesquite: Very intense. Use this sparingly or as a blend, as it can become bitter over a long 10-hour cook.
- Fruitwoods (Apple/Cherry): Generally too mild for brisket, but they can add a beautiful reddish hue to the bark if mixed with Oak.
Conclusion
Smoking a brisket on the Ninja Woodfire Grill is a rewarding journey that proves you don’t need a massive rig to achieve world-class results. By understanding the unique convection environment of the Ninja and respecting the traditional steps of the brisket process—selection, trimming, wrapping, and resting—you can produce a meal that rivals the best barbecue joints. The key is consistency and observation. Every brisket is different, but with the Ninja’s precise controls, you have all the tools necessary to become a backyard pitmaster.
Frequently Asked Questions
1. Is the Ninja Woodfire Grill big enough for a whole brisket?
A standard 12-15 lb packer brisket will not fit without significant trimming. It is recommended to purchase a 5-7 lb flat or to cut a larger brisket into two pieces (the point and the flat) and smoke them side-by-side if they fit, or separately.
2. Should I cook fat-side up or fat-side down?
On the Ninja Woodfire Grill, the heat is relatively even due to the convection fan, but it leans toward being a “bottom-up” heat source. Most users find success with fat-side down to protect the meat from the grate, though fat-side up is excellent for allowing the rendering fat to baste the flat.
3. Do I need to use Ninja-branded pellets?
You do not have to, but Ninja pellets are sized specifically for their ignition system. If you use other brands, ensure they are 100% hardwood and not too long, as overly long pellets can occasionally cause jams in the small gravity-fed box.
4. How long does a 6lb brisket take on the Ninja?
At 225°F, you should budget approximately 1.5 hours per pound. Including the stall and the wrap, a 6lb brisket will likely take 8-10 hours, plus a 2-hour rest. Always plan for extra time; you can always keep a brisket in a cooler longer, but you cannot rush it once it’s on the grill.
5. Why don’t I see a deep pink smoke ring?
Smoke rings are a chemical reaction between nitrogen dioxide and myoglobin. Electric grills often produce a less pronounced smoke ring than wood-burning pits because the combustion is different. However, the flavor will still be there. For a better ring, ensure the meat is cold when it goes onto the smoker.
Last update on 2026-06-17 / Affiliate links / Images from Amazon Product Advertising API
*We may earn a commission for purchases made using our links. Please see our disclosure to learn more.